
Status: In-Review
If you've played around with programming embedded systems you've eventually come across the topic of bootloaders. In case you haven't, bootloaders are programs that make it possible to program your microcontroller (MCU) from more traditional peripherals rather than an in-system programmer (ISP). If you've used Arduinos, you've certainly used a bootloader but likely without knowing it.
Bootloaders are useful for a few reasons that are likely a function of what kind of development you do. If you do mainly hobby level development, a bootloader can free up an ISP that, if you're like me, and have multiple projects and only one programmer, not needing the ISP can be handy. If you are developing for a product, having a way to update your embedded code in the field can be very helpful. For the most part it is unrealistic or inconvenient to do this upgrade by sending out ISPs or returning the product. However, if you have a bootloader with a convenient way of uploading the embedded code, you can save the hassle. Another reason you might want to learn about bootloaders is to gain a better understanding about the memory layout of the MCU, using the linker, byte ordering, and the programming process as a whole.
Regardless of why you are trying to learn about bootloaders, my experience has been that there aren't a whole lot of tutorials about them. There seems to be a lot of general information and existing optimized bootloaders. The general information is great but lacks the nitty gritty of seeing the actual code and the existing solutions are written to take up as little space as possible so can be obtuse in the code. This write-up is mainly to serve as a reference for myself and fill the void for anyone else that's in my position. Here's what to expect if you continue reading:
The first tutorial I found useful for using a bootloader to upload an application to flash was on pocketmagic.net, A Simple AVR Bootloader. What I appreciated about this tutorial is that it walks the reader through steps to compile the code, which includes passing in linker flags. If you're not use to this this is very helpful. I also appreciate that the tutorial really steps through the process with a simple objective; to write a program that is stored in an array, in the bootloader, to Flash. This takes out the communication need between the PC and the MCU and allows the user to concentrate on what the bootloader does. Unfortunately the formatting of the webpage cuts off some info so you have to right click on the page and view page source.
The next project I found useful (not a tutorial) was Magboot. This project really linked bootloader side and PC side of things. If you try and implement the project, you can learn a lot.
Optiboot is worth mentioning (I believe it is one of the the Arduino bootloaders) but I find it a bit too optimized to learn from.
Finally, the bootloader that I am considering here and will talk about is the one developed by Dean Camera and found in the LUFA library. I have previously used this library for the USB functionality, which works great, so why not try the bootloader?
There are several options to build the actual bootloader code. You can use find the library in Atmel Studio and build one of the sample projects that comes with the library. This is very useful because you can check the compiler -D options and the linker flags. This does require a Windows machine becuase of the reliance on Atmel Studio, which I'm not necessarily against but I do enjoy woking on my Debian machine with makefiles. IDEs keep things simple but I appreciate working a layer below. So that being said, we will build this bootloader with the supplied makefile.
The bootloader will be built for an ATmega32u4. The USB capability of this MCU is really what guided the choice of the LUFA bootloader. If I were using an AVR without USB, I would consider a simpler bootloader.
Now before I go on, I want to remind myself of the following:
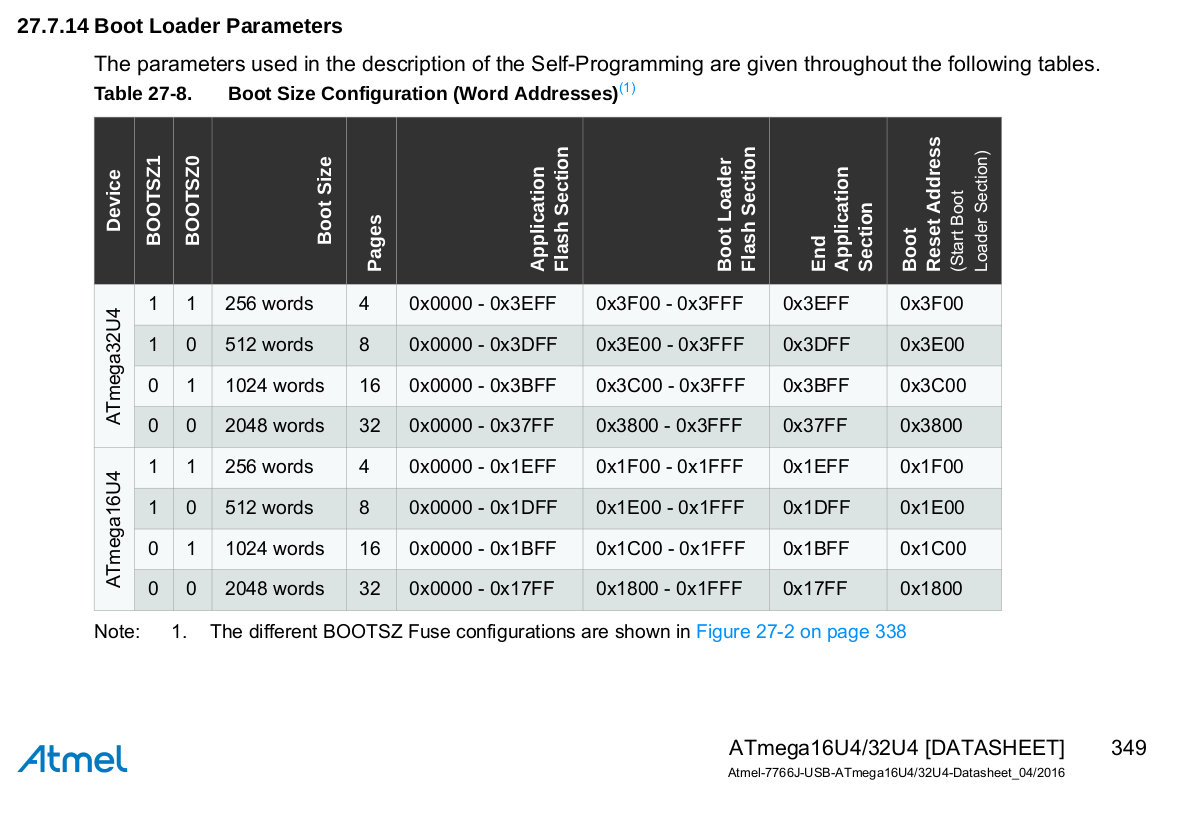
The boatloader lives in a special* location at the end of the Flash. The start address of this special location depends on the value of a pair of fuses: BOOTSZ0 and BOOTSZ1.

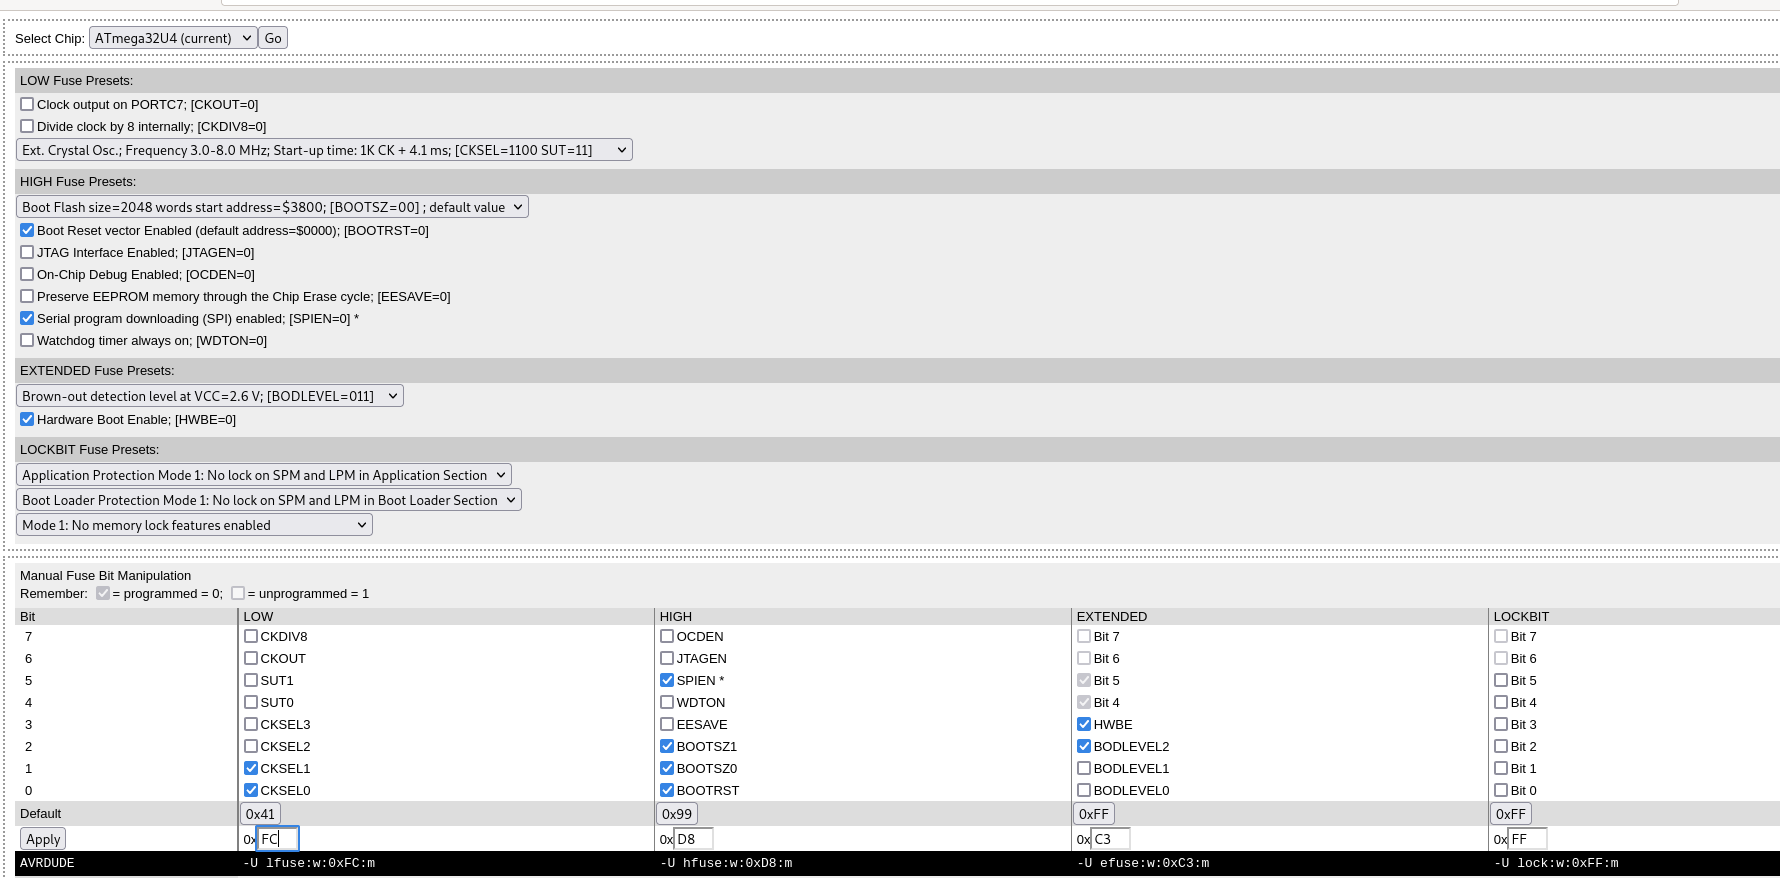
The values of the fuses for the ATmega32u4 can be determined from the first rows. For example, I want a 4 kB bootloader space which corresponds to the 4th row of the table (2048 words = 4096 bytes = 4 kB). This givees BOOTSZ0 = BOOTSZ1 = 0. So both need to be programmed to 0. REcall that with fuses, a value of 0 means they are programmed. The screenshot below shows the determination of the fuses from an online AVR calculator.

The checkmark indicates that the fuse is programmed (corresponds to a zero). In addition to the BOOTSZ0 = BOOTSZ1 = 0 in the high fuse, I have enabled the BOOTRST, and disabled the JTAG programming and watchdog timer bits in the hfuse. The latter turns out to be important. The bootloader would not run with WDTON bit enabled. The low fuse is set to be externally clocked with the ATmega32u4's 16 MHz crystal. The efuse has the HWBE bit enabled.
So BOOTSZ0 and BOOTSZ1 are programmed, which according to the table included above from the datasheet gives us 4 kB of space for the bootloader with a starting address of 0x3800. This value is important because we need to pass it to the linker so the bootloader is in the correct location. Now, this is where confusion can happen: This address is in words but the avr-gcc linker needs the value in bytes. 1 word = 2 bytes for the ATmega32u4 so we just need to double the value: 0x7000. In the linking phase of building the binary we add in the flag: -Wl,--section-start=.text=0x7000. This is a bit of FYI because LUFA CDC bootloader determines this address location automatically based on some defines in the makefile.
There is a lot of information packed in here so this will conclude Part 1 of the AVR bootloader notes. Part 2 will go into the compiling LUFA's CDC bootloader and using it to flash code. I hope this proofs helpful. If you have questions, feel free to e-mail me at the address in Contacts.